

How To Record Youtube Backign Track And Guitar At The Same Time
YouTube has go a massive opportunity for guitarists to showcase their music, build an audience, and potentially first a career. Whether you want to record guitar videos for YouTube for fun or for bigger goals, this guide will explicate how to get the best quality videos with the least effort.
Considering there are and so many guitarists on YouTube, you want to make sure your videos stand out. The proficient news is that y'all don't need expensive equipment to brand neat looking YouTube videos.
With the techniques, tricks, and tips in this guide, you'll be able to create smashing-looking guitar videos for YouTube.
In this guide, yous will larn:
- Different equipment options for recording audio and video
- How to set up the right lighting to assistance your videos smooth
- How to record and edit great quality audio
- Examples of good and bad guitar YouTube videos
- A range of tips to start or grow your YouTube aqueduct
This is the most detailed guide online on how to record guitar videos for YouTube, and so bookmark/favorite information technology so you can come up back at whatever time to review the tips and advice.
What Makes a Slap-up Guitar Video
Before nosotros expect at equipment and recording techniques, it's a good idea to take a look at what makes a nifty guitar video on YouTube.
There are three aspects to making a great guitar video for YouTube and all three demand to be dealt with properly. Permit's take a quick await at each aspect before digging into the details.
Video Quality
Video quality is important and worth the time and effort to get correct. Nobody wants to run across a blurry or pixellated recording that looks like it was filmed with a tater.
The well-nigh obvious function of video quality is the video's resolution. The higher the resolution, the clearer the video will exist.
The minimum standard people wait to see on YouTube today is 1080p (1920 10 1080) also known as Total Hd. I'll talk about this when we expect at cameras.
Here's a comparison of the difference betwixt a loftier-resolution video and a depression-resolution video:
Notice even in the pocket-size epitome above how the screenshot on the right looks slightly blurry while the one on the left is precipitous and clear. That'southward the difference resolution makes. It should be obvious that a higher resolution is always better.
Another attribute of video quality is the frame rate.
The frame rate is how many frames the camera takes per 2nd. Movies are filmed in 24 fps (frames per second) and that frame rate is skilful for the cinematic experience, but not very skillful for guitar videos.
Typical smartphones and cameras tape video by default at 30 fps. This is the basic standard for videos on YouTube.
Your smartphone or camera may offer an option to tape at lx fps. More and more videos on YouTube are showing up in 60 fps and it is gradually becoming standard for many types of videos.
If you lot've never paid attention to frame rate before, go find a video that has '1080p60' as an option in the settings and spotter it. Guitar videos in 60 fps look significantly smoother and give a more professional wait and experience to your video.
If your camera supports both 30 and lx fps, I recommend testing both to see what y'all prefer. 60 fps tends to look ameliorate for guitar videos, but it also raises the file size and time it takes for your video editor to procedure the file.
The tertiary and least talked about aspect of video quality is the lighting used.
You can use a super-expensive photographic camera and still end up with a low-quality video if your lighting isn't gear up properly.
What makes the departure betwixt adept video quality and nifty video quality is the lighting. Information technology's such an important topic so I'll explain it in detail later in this guide.
Sound Quality
It should exist no surprise that audio quality is important when recording guitar videos for YouTube.
People who lookout man guitar videos on YouTube expect good quality guitar tones. If y'all've ever seen a video on YouTube with bad guitar tones, you probably also noticed the comments lament nigh how bad the tone was.
Fortunately, sound quality is easy to become correct when you lot record your guitar in the right way. It's a crucial attribute to the video's overall quality, and then I'll talk about it in detail later in this guide.
It'south also worth mentioning that good sound quality tin can make up for average video quality. Even if you can't get the best quality photographic camera, people will yet savor your video if the audio quality is good. Then audio quality is your pinnacle priority when recording your videos.
High audio quality tin can make up for average video quality, only high video quality cannot make up for boilerplate quality sound.
Performance Quality
The third attribute of what makes a swell guitar video is your performance.
People don't just listen to guitar videos on YouTube, they watch the guitarist perform. Go along this in mind when y'all record your videos.
While y'all might not feel like yous're performing for an audition when you record your video, recall of it as if it is a live operation with a crowd watching y'all. Put on a prove and make the video enjoyable to spotter.
Imagine watching a video of an energetic song and the guitar just sits at that place in his chamber with an expressionless confront as he plods through the song. Even if the technical side of the performance is spot on, the video will exist defective.
Earlier y'all record any vocal, think nigh the performance side of things. Is the song energetic, frantic, or ambitious? Or is the vocal emotional, delicate, or expressive? Brand certain your performance matches the vocal.
Learning from popular guitar videos on YouTube
Have a search on YouTube for "guitar cover" and scout some of the height videos with the sound muted.
By muting the sound, it forces you to pay attention to what y'all are seeing instead of beingness distracted past what you would hear or the guitarist's abilities.
What type of camera angles are used? Can y'all see the guitarist's face while playing or is the camera focused on the fretboard? Are multiple cameras used? How often does the video cut back and forth between camera angles?
What is in the background? What type of performance is the guitarist putting into the video? In what way is the video entertaining to scout?
Write notes on what you similar and dislike from the summit videos to requite you a meliorate idea on what to focus on in your own videos.
Cameras for Recording Guitar Videos
People look to encounter expert looking videos on YouTube today. A low-quality video recording tin can distract from a great guitar operation.
While y'all will need a high-quality photographic camera that tin can take expert videos, that doesn't mean information technology needs to be an expensive camera.
The minimum accepted standard for videos on YouTube is they demand to have a resolution of 1080p (1920 10 1080) also known as Full Hd.
If you have a camera that tin record at 4K resolution, you tin can consider it, but I recommend sticking to 1080p.
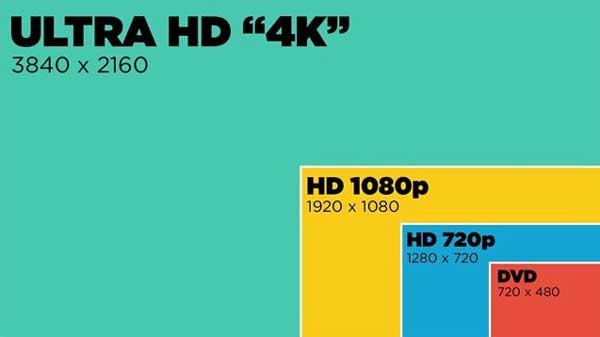
As y'all can run into in the comparison above, 4K uses a significantly higher resolution than Full Hard disk. While this might seem like a better choice, at that place are downsides to recording in 4K.
First, the file sizes are significantly college, which means it takes far longer to process the videos during editing. Second, more than and more people are watching YouTube on mobile devices, so the extra high resolution of 4K is wasted on modest screens. 1080p is more than enough at present and will be in the hereafter.
Permit'south get through the different camera options for recording guitar videos for YouTube. After looking at each type of camera, I'll explain how to use tripods or stands for each option.
Smartphones
The good news is a typical modern smartphone can record fantastic quality 1080p videos, so yous might not need to purchase a camera at all. High-cease smartphones take seriously impressive cameras that rival many bespeak and shoot cameras.
If y'all already accept a decent smartphone that tin record 1080p video, I recommend doing a few practice video shoots with your smartphone before y'all consider buying anything else.
After yous learn some useful recording tricks and proper lighting techniques, you may find that your smartphone is fully capable of recording fantastic quality videos.
Smartphone cameras apply a smaller sensor, which means they accept in less low-cal when compared to a DSLR or Point and Shoot camera. This means the quality of your lighting is crucial to get the best looking videos with a smartphone.
Webcams
While I don't recommend using any webcam built into a laptop, external webcams tin produce decent quality videos for YouTube.
The Logitech C920 Pro webcam (link to Amazon) can record 1080p video and is incredibly popular.
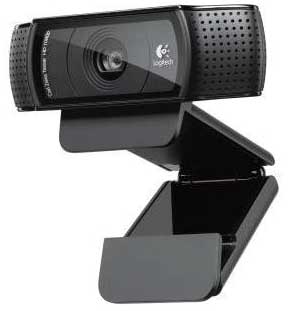
I have the above webcam and have used it for a few YouTube videos and was happy with the quality. It may not compare well confronting a proper DSLR, just information technology's a far cheaper option if you're on a budget.
This webcam has an inbuilt clip y'all tin utilize to mount to a computer monitor and it uses a standard photographic camera mounting thread to connect to any photographic camera stand or tripod.
The advantage of recording your videos with a webcam is that it saves the recording directly on your reckoner. That means yous tin easily open it and edit it without having to download files from your smartphone or camera.
The downside to using a webcam is that y'all're tethered to your computer. This ways if you want to record your video outdoors or abroad from your figurer, information technology might be catchy.
DSLRs and Mirrorless Cameras
DSLRs and mirrorless cameras are the gilded standard for creating the best looking videos.
While DSLRs (Digital Single-Lens Reflex) produce the best looking videos out of all of the cameras covered here, they can be quite expensive.
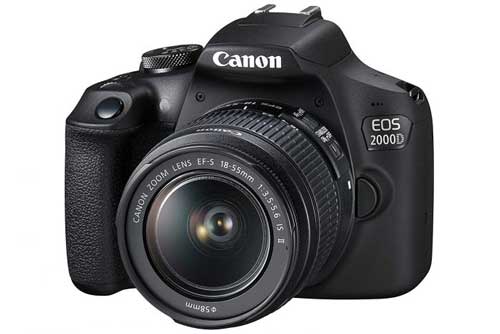
They as well have a bigger learning bend when compared to a smartphone or point and shoot camera. They're not necessarily hard to learn, but it helps if you know how to use them properly.
DSLR cameras are beefy compared to other options simply have the best range of accessories such as lenses.
Lower finish DSLRs are even so capable of seriously impressive quality videos and a second-manus camera tin relieve you a lot of money. Because there are so many DSLR models and new models coming out every yr, information technology is pretty piece of cake to find a cheap 2d-hand camera that volition cover what you demand.
If you lot're thinking about getting a DSLR, consider buying a bundle like 1 of these (link to Amazon) that includes all the accessories y'all would likely purchase over fourth dimension.
Amirrorless camera is like to a DSLR in terms of quality while having a smaller size.
As the name suggests, the big difference between a DSLR and a mirrorless photographic camera is that it doesn't use a mirror. This is why they're more compact compared to DSLRs.
If you want to produce the all-time quality video for your videos on YouTube, I recommend a mirrorless photographic camera instead of a DSLR.
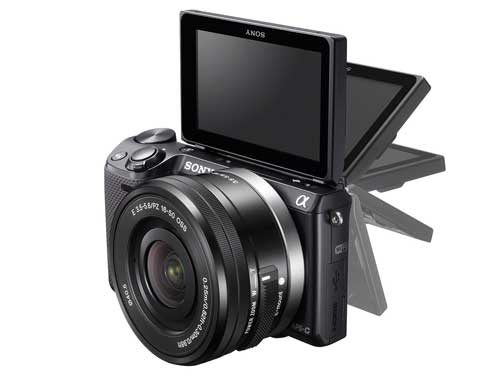
One feature I propose looking for in a mirrorless camera is a flip-up or selfie screen. Beingness able to prepare up your camera on a tripod and meet how everything looks while sitting or continuing with your guitar is much easier than trying to gear up up a DSLR by yourself.
I recently purchased a Catechism EOS M50, which is a budget-level mirrorless photographic camera. I immediately noticed a massive increase in video quality compared to the smartphone and webcam I had been using.
While there are many better quality mirrorless cameras, they come up at a significantly higher price.
I chose this camera as my main camera for videos as well as photos for tutorials such as my guitar pedal builds. Equally y'all can encounter below, it includes a touchscreen that can flip out to the side and rotate, which gives yous a articulate view of the screen while you're performing.
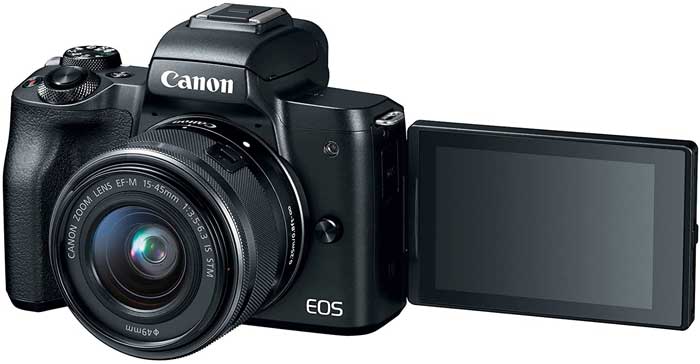
For some guitarists, a DSLR or mirrorless camera will be overkill and far also expensive. But if you have the budget and actually want summit-quality video, this is the mode to go.
Point and Shoot Cameras
A cheaper alternative to a DSLR or a mirrorless camera is a 'point and shoot' camera. Most modern point and shoot cameras are capable of producing great quality 1080p video.
The departure in quality between a practiced point and shoot photographic camera and a DSLR isn't worth the extra money for a DSLR for nigh people.
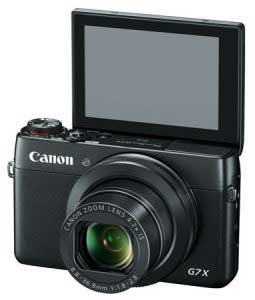
These cameras are quick and easy to apply. Many accept flip screens similar the ane above that allow you see what will be recorded from your performing position.
For about guitarists looking at getting into YouTube, either a smartphone camera or a point and shoot camera will be a perfectly fine starting point.
If in the future your channel starts to grow, you may decide to gradually upgrade your equipment and motility towards a mirrorless photographic camera. Only for most guitarists, I recommend starting off with something simple to use that won't cost you too much.
Camera Stands and Tripods
Camera stands and tripods give you lot the flexibility to position the photographic camera wherever you want it for the perfect camera angles.
If you desire to try using your smartphone to tape your guitar videos, you lot will need to purchase an attachment to connect your telephone to a camera stand or tripod.
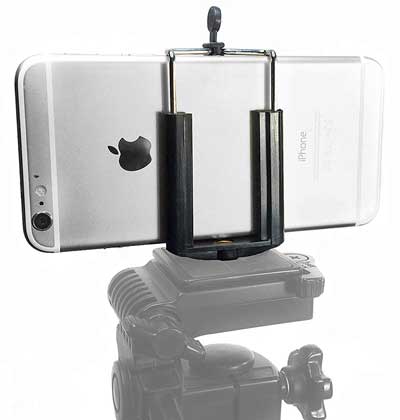
The above smartphone attachment (link to Amazon) lets you connect your smartphone to any standard camera tripod or stand, then information technology's worth getting.
A simple desktop stand is quick and like shooting fish in a barrel to prepare upwardly on a desk or table and might be all that you need to properly position your camera or smartphone to record.
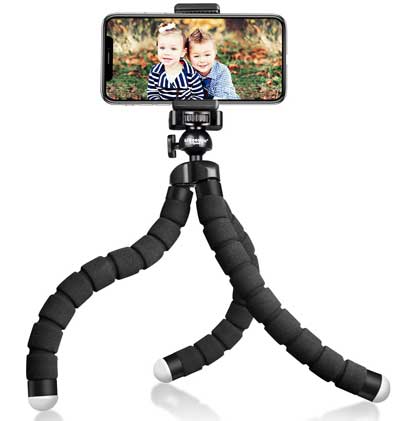
Even if you plan on buying a tripod, a modest and portable stand like the adaptable stand shown above (link to Amazon) is handy to take.
Alternatively, you may want to get a proper camera tripod like this 1 (link to Amazon) so you lot have more flexibility to position your smartphone for the all-time angles.
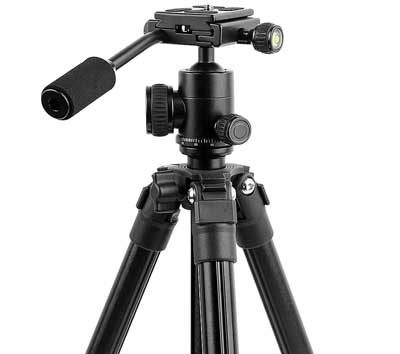
A large tripod might take upwardly more room and more of a hassle to deal with, but it gives you complete freedom with positioning your camera in the right spot.
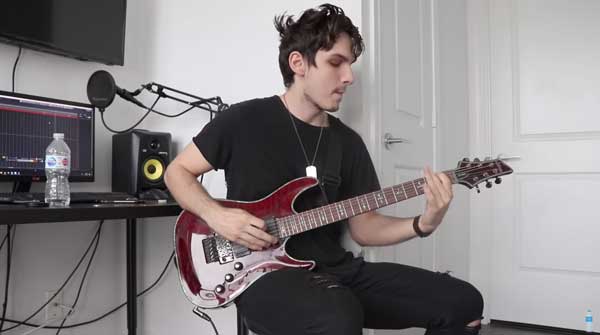
Setting Up an Area For Recording
Once you accept a camera and stand/tripod, the next step is to consider where you will record your videos.
Having a dedicated infinite for your to record your guitar videos is the best option as it means y'all don't need to worry about setting upwardly your equipment every time you desire to record a video. Beingness able to bound into your recording space and have everything gear up to get is highly recommended.
Read this guide on setting up a dedicated practice space for ideas on how you lot tin set up a space dedicated for recording your videos. That guide focuses on do spaces, but the same ideas apply to a recording space.
Video Background
The background in your video is of import to call back nigh as it can mean the difference between an amateur-looking video and a professional-looking video.
While guitarists were able to get away with it in the early days of YouTube, nobody actually wants to watch y'all play guitar sitting on a messy bed with dress lying around the room.
You lot take two basic options when thinking about the background for your video. You tin either show your room in the background or apply a screen to block it out.
If you want to show your room, attempt to make it as appealing as possible. The fewer distractions in the background, the ameliorate.
In the to a higher place screenshot, y'all can see that the background has been carefully thought nigh. The guitarist is using lights on stands to add some visual involvement to the scene during wide shots (like the to a higher place screenshot).
If you want to cake your room out, you can either use a plain screen or material for a plain background or use a light-green screen to remove the groundwork during editing.
In the in a higher place screenshot for a video I created, I bought a cheap green/blueish screen (it is green on the other side) to use as the background. I was going to use it to remove the background and supersede it with something else in editing, only I decided I liked the bright bluish groundwork (this is an instance of how to discover ways to stand up out from the crowd and brand your videos expect different).
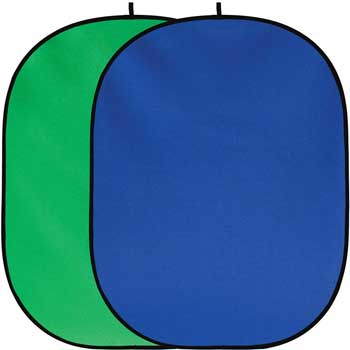
A greenish/bluish screen like this one (link to Amazon) works well for guitar videos. Information technology folds up into a adequately pocket-sized package and allows you to tape your videos wherever you want.
I recommend using a plain background screen instead of digitally removing the background in editing. While using a green screen and removing the background isn't difficult, it is an extra footstep that yous may become sick of doing in every video.
Keep it simple in the beginning with a plain background so you can focus your video on your playing.
Lighting
As mentioned earlier, lighting plays a massive office in video quality. If you get your lighting wrong, your video volition await similar trash.
Y'all won't find it while watching good quality YouTube videos, just a lot of thought goes into the position and blazon of lights used.
Here are some common examples of poor lighting and how it tin ruin your videos or make them look non-expert:
The above screenshots are taken from videos I've establish on YouTube that all suffer from bad lighting issues. Here is a breakup of the issues in these videos:
- The top-left video seriously suffers from a lack of lighting. The light haemorrhage in through the blinds in the background makes the outcome even worse as the background is at present brighter than the guitarist. This video was recorded on a good quality camera (it was Full Hard disk drive at 60fps), but the video is ruined past poor lighting.
- The bottom-left video looks low quality because it relies completely on ambient lighting. Notice that the strings on the guitar have basically disappeared. That's because in that location is no light source to illuminate them. Simply adding a light source somewhere behind the camera would seriously improve the quality of this video. Ambient lighting can as well crusade a blurry look as your photographic camera struggles to recoup. The background is also total of distractions.
- The summit- right video suffers from a natural light source that is casting shadows directly on the guitarist and over-exposing areas. Avoid natural lighting and shut all windows to avoid issues like this. Cameras struggle in conditions like this as they tin can't deal with very brilliant and very nighttime areas in the aforementioned scene.
- The bottom-right video suffers from relying on natural lighting and there is a light source on the elevation-left that creates a distracting flare in the frame. The orange tint is a issue of relying on ceiling lights. Calculation a low-cal source behind the camera would make a huge divergence to the quality of this video.
The main point to remember with the above screenshots is that even if the guitarist gives a fantastic performance, people won't take it seriously due to the low-quality video.
The cardinal to good lighting in a video is to apply dedicated lights in the correct positions.
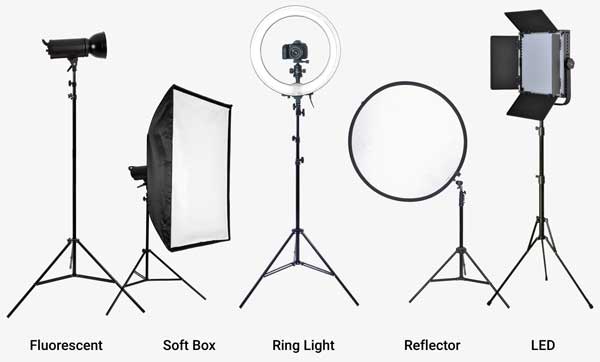
The higher up lights are the typical types of lights used past YouTubers. I recommend having either ii or 3 lights like these softboxes (link to Amazon) to use what is known as 2-point or three-point lighting as shown beneath:
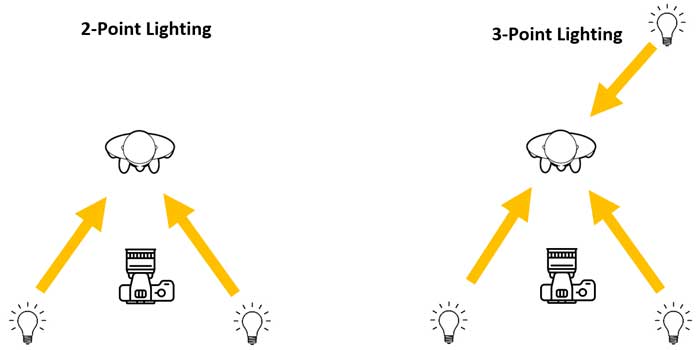
The bones idea is that the 2 lights behind the photographic camera light upwardly the guitarist from broad angles. This helps requite your hands, the fretboard, and your face and body a articulate view from the camera.
You can optionally add another lite somewhere hidden in the background pointing to your back to assist light you from a different angle. Commonly the backlight is dimmer or may even exist a different colour (eg: warm white instead of cold white). Make certain this tertiary low-cal isn't pointing at the photographic camera or it volition crusade issues.
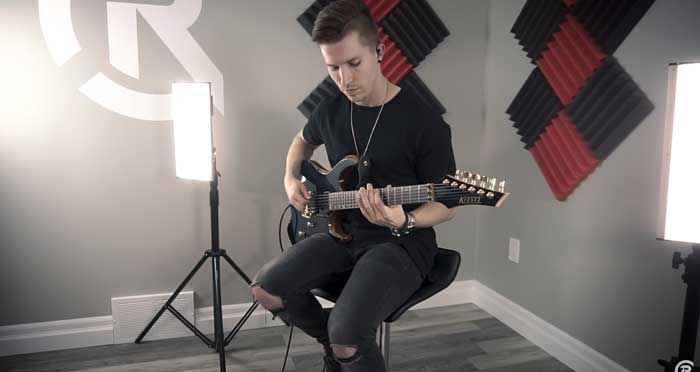
The below screenshot from a video by Rabea Massaad shows an extreme view (in a good way) of what information technology looks like when you use a backlight:
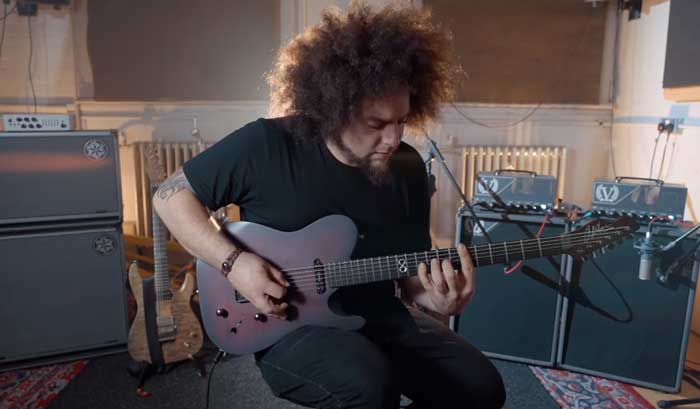
Y'all tin can see that the warm colored light in the background is lighting up the side of his hair. This adds a lot of character and warmth to the video and you would definitely notice it if the light was switched off. These types of artistic lighting effects can create a large improvement to the overall quality of a video.
In the above screenshot, you can also see that a vivid light source was used backside the photographic camera to the left and no light source was used on the right. Adding a subtle light source to the correct would take helped add together definition to the video.
The above video is a skillful instance of how you can use lighting to come upwardly with dissimilar styles in your video. By adding or removing a low-cal or adding a different-colored light, you can significantly change the look and feel of your video.
This type of set up ensures that you and your guitar are properly lit up without having ugly shadows casting over your hands or body.
The below screenshot shows a very well lit video that uses three-point lighting:
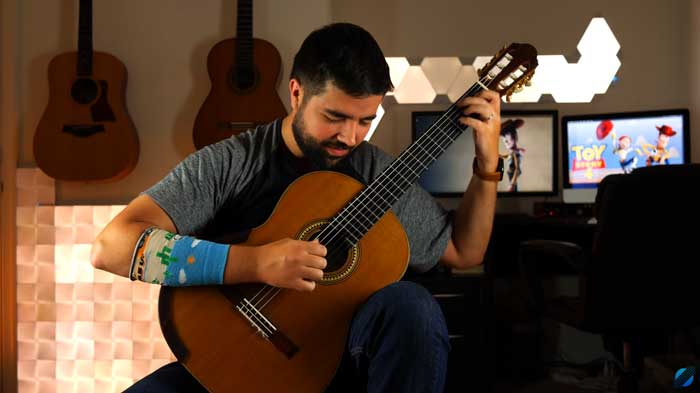
In the in a higher place screenshot, you can see that the face up and guitar are lit up from 2 different directions. That's the type of results you can expect if y'all ready upwardly lighting properly. The lights in the background also give the room depth and brand it interesting.
Here'due south the same video from a different angle so you can come across how the lighting makes the guitar and his hands crystal articulate:
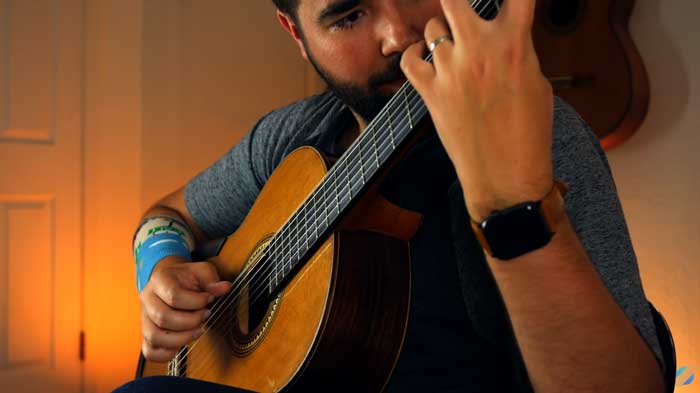
From this angle, yous can see how important the backlight is in creating an ambiance for the video. His easily and the strings are besides incredibly sharp while playing thanks to the lighting.
Here are some important tips to remember when lighting your guitar videos:
- Avoid using any natural lighting from windows equally a change in sunlight can dramatically change your videos
- Don't rely on normal lighting from ceiling lights every bit they don't provide enough light for videos
- More calorie-free is better than not enough lite
Camera Angles When Recording Guitar
The camera angles you lot use in your video are of import to plan out. The right angles can make your video look professional. The incorrect angles not only makes you await similar an amateur, but it can be frustrating for your viewers.
Hither are a few common camera angles used in guitar videos on YouTube.
Medium shot: this angle aims to capture your face up, torso, and the full guitar.
The cardinal points to making this shot wait good are to have a skilful groundwork, practiced lighting, and ready the camera at about chest height. Be careful not to accept the photographic camera too far away that it becomes hard to see what the guitarist is doing.
Over headstock: this bending can await good when playing lower downward the fretboard. Think of this angle as more of a performance angle because information technology can make information technology hard for the viewer to clearly meet what you are playing.
The height of the photographic camera matters when using this angle and so experiment with different heights to see what works for you. Be conscientious to make sure the photographic camera is focused on your fretboard rather than the background which will crusade the fretboard to get blurry (I've seen it in a few videos).
GoPro: If you have a GoPro, you might also want to endeavour mounting information technology to your guitar in some way for some really creative shots.
Mounting a GoPro to your guitar is a great mode to capture some cracking shots during live performances. Depending on the mountain you buy, you lot tin can bending the camera to point downwards the fretboard, clip it to the guitar body or even utilize a head strap so the viewer tin can watch you play from your point of view.
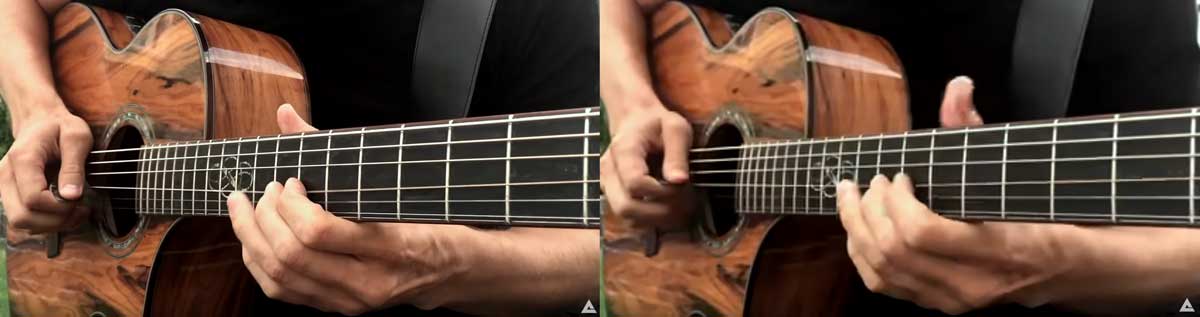
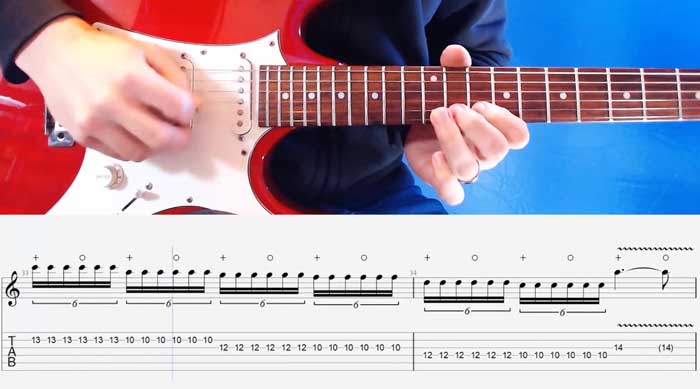
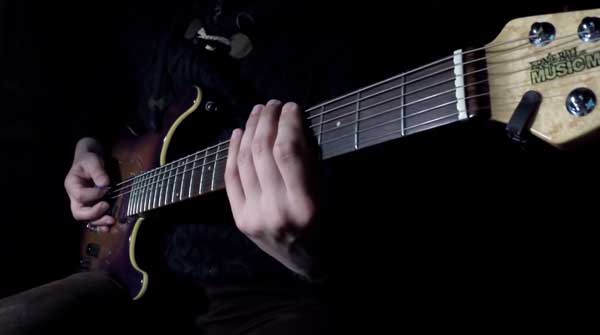
Fretboard shut up: guitarists similar to meet shut-up angles because it makes it clear what your hands are doing. I used a close-up angle for my tutorial videos to make it easy to learn from the video.
In the higher up screenshot, I tried to keep my fretboard horizontal so it lines up with the transcription below. You lot might want to experiment with holding your guitar at dissimilar angles for some more interesting views of the fretboard.
Creative angles: while you will want to stick to the in a higher place photographic camera angles almost of the time, it's a skilful idea to attempt and come up with some creative angles to give your videos uniqueness.
Creating unique videos is how you tin stand up out from the countless other videos on YouTube. If you only copy what other people do, it's really hard to stand up out.
A practiced example of a artistic camera angle is when a camera is mounted on the within of an acoustic guitar equally shown beneath:
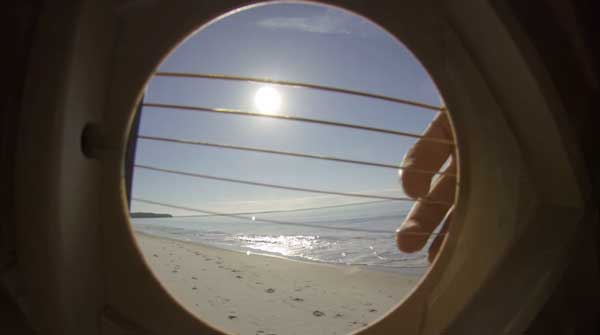
Experiment with equally many different angles as you can think of to run into what might work. I've seen videos go viral simply due to the creative camera angles used.
Best Ways to Tape Your Guitar for YouTube
In that location are two basic methods you can use to record the audio for your YouTube video. The correct method for yous depends on what blazon of guitar you employ and how you lot plan on setting up your guitar tones.
While you could use your photographic camera or smartphone's inbuilt microphone, I exercise non recommend it. Fifty-fifty expensive cameras have poor microphones when it comes to recording guitars, and so don't even consider it. If you want good quality audio in your videos, do non apply your camera's microphone.
Amp and Microphone
The showtime method is to apply a microphone to tape your amp. You identify a microphone in front of your amp's speaker and connect the microphone to an audio interface.
Or if yous will be playing acoustic guitar, you lot use a microphone to record your acoustic guitar. For acoustic guitarists, this is the all-time method along with using any piezo pickups built in your guitar.
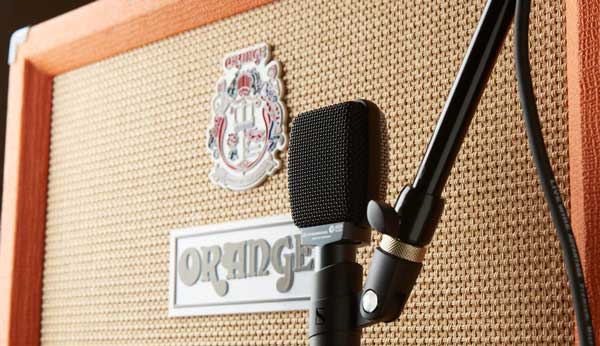
While recording your amp with a microphone tin produce some bully results, there are a lot of potential problems with this method.
Here are the reasons I don't generally recommend recording using an amp and mic for YouTube:
- Information technology requires a lot of setting up to position the mic properly and dial in the right settings. That tin chop-chop become frustrating later a few videos
- Consistency can exist difficult between recordings as you need the exact amp settings and microphone position every fourth dimension
- You may not be able to record good quality tones without a high amp volume – which limits when and where you can tape your videos
- Unless yous're a pro at recording your amp using a mic, you tin can probably get far better results with direct recording
- You are unable to change any amp settings after recording. If you find the gain was too loftier or book was likewise depression, you demand to re-record everything
Instead of recording your guitar amp with a microphone, I recommend using direct recording using an sound interface.
Directly Recording
I highly recommend reading through this guide on Recording Guitar at Home for full details on this method. Below I'll give you the bones details but the guide on recording guitar goes into more options and information.
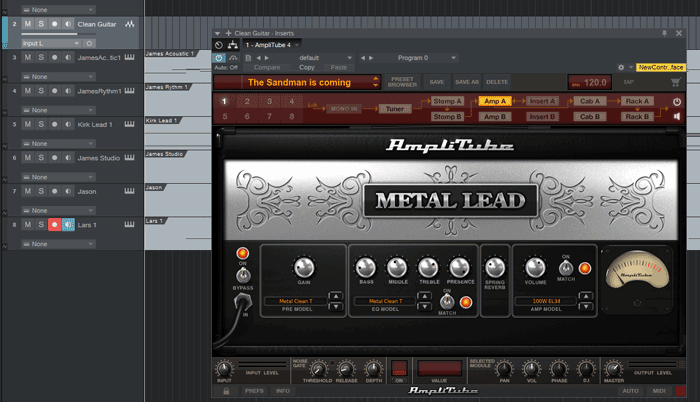
The basic idea is that you connect your guitar to an audio interface and record your guitar directly into a DAW. Then y'all can apply amp modeling software such as AmpliTube, BIAS FX, or Line half dozen Helix Native to prepare up the perfect simulated amps, mics, and settings for any tone yous want.
The big reward of this method is that you tin easily dial in the perfect tone before or after recording. After recording you can go into your DAW and adjust the amp or pedal settings to perfectly fit with the backing track.
Here is a bones rundown of what you need to record directly to your figurer:
Audio Interface
An sound interface lets you connect your guitar to your figurer. Some modern guitar amps and most multi-furnishings pedals can act every bit an sound interface, so depending on what gear you already have, y'all may not demand to buy anything actress.
Learn everything you want to know in this guide on the Best Sound Interfaces for Guitar.
If your amp or pedals don't offer USB recording, a simple audio interface like the Focusrite Scarlett range (link to Amazon for different models) is incredibly pop for producing studio-quality recordings at a low cost.
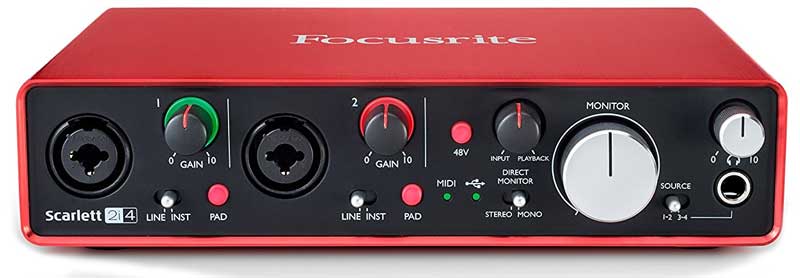
There are enough of different interfaces with the principal divergence between them beingness the number and type of inputs. Make sure yous get an interface that can handy all the inputs you want. So if you plan on recording vocals with your guitar, get one that has mic input (like the Focusrite).
Check out the Best Audio Interfaces for Guitar here. The guide includes options for all budgets and recording needs.
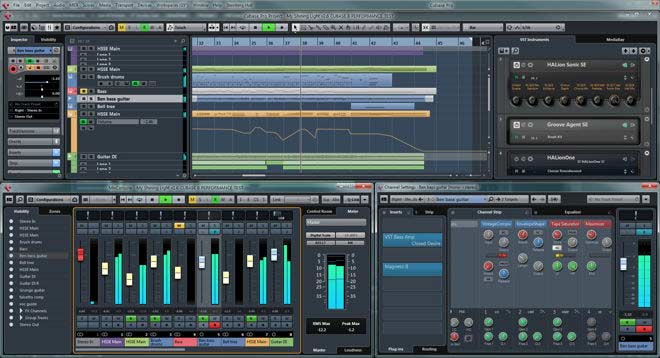
DAW (Digital Audio Workstation)
The DAW is the software you lot use to tape your guitar. There are quite a few different options and each piece of work in different means.
If y'all don't already have a DAW, cheque out this guide on the Best DAWs for Guitar.
Each DAW can be very unlike to employ, so have a read through the guide to find the one that suits you the best.
I personally utilise Studio 1 and highly recommend it due to it being incredibly easy to record guitar tracks. Observe out how to record guitar using Studio One in this step-by-step tutorial.
One time you know the basics, check out my tutorial on recording a song to run into step by step how to use Studio 1 to tape a song from start to finish including creating a backing track with virtual instruments.
Once you accept chosen a DAW, you lot can apply it to record audio for your YouTube videos.
If you're looking for a free and like shooting fish in a barrel culling to a DAW to get you started, you can download Audacity (link to their website) right now. It's a bones sound editor that is very limited compared to a proper DAW, but it does a practiced job at recording sound.
Cheque out this stride-by-step tutorial on how to record guitar using Audacity. It's an like shooting fish in a barrel style to get started recording guitar correct now.
If you lot use a Mac, a costless option worth trying is GarageBand.
Amp Modeling Software / Plugins
The amp modeling software and cabinet simulators available today are seriously impressive. While professionals may prefer to deal with existent amps and microphones in a studio, that's overkill when creating YouTube videos.
AmpliTube 4, BIAS FX, and Line half dozen Helix Native are some of the most powerful and realistic plugins you can use in a DAW to edit your guitar tones. If you've never used these plugins before, you might exist surprised past how good they audio.
A big benefit of using one of these plugins is that yous tin can easily salve your settings and instantly load them for whatsoever future videos. This helps you create perfectly consistent tones between unlike recordings.
You're also able to easily spring in and tweak or completely change amp models, effects, or settings subsequently you record your performance.
Retrieve to read through my Ultimate Guide to Recording Guitar at Home for more details on the recording process, software, and tips.
Tips for Recording Your Video
In one case you lot have all the equipment needed and you accept it all gear up, it's time to record. Let's go through some bones tips and all-time practices to salvage yous some headaches and get the best results.
Practice Your Song Until Information technology Is Flawless
Recording a 3-minute song sounds like a quick and easy task, but the fourth dimension it takes can easily spiral out of control if y'all're unprepared.
If yous play a mistake during recording, you probably won't desire to go along it in the final video. So unless you know the song and so well you tin play it flawlessly every time, you're going to be doing a lot of takes.
While everybody (even virtuosos) brand mistakes, yous can cut downwardly on the number of takes y'all demand to record by actually preparing for the recording. Practise every function of the song and so well that you tin can confidently hit tape and know you'll get through it without whatsoever issues.
Record The Song In Sections
While some guitar videos y'all see on YouTube are ane long accept, many weren't recorded that manner. About videos you meet were recorded in sections and edited together to await similar i seamless take.
While some may say this is cheating and non a true functioning, others recognize it's a way to make the recording procedure easier.
In some videos, you tin can clearly see from the camera angles that the video is a combination of different takes. Some camera angles are up-close to the fretboard, so when it cuts to a wide shot, yous can't see whatever other cameras set upward. It'southward perfectly fine to combine different takes into one video if you exercise a good job in editing.
Past breaking the song down into sections and recording i section at a time, you will likely become through the song faster and end up with better results.
Handclapping Syncing
Having your video and audio perfectly in sync is crucial to become right. When filming a movie, they use a clapboard as shown below to make a loud audio before a take:

The thought is that when the editor tries to sync the audio recording with the video, he tin line up the handclapping heard in the audio with the move of the clapboard in the video.
When recording your guitar, there are a couple of ways you lot can brand your job of syncing the audio and video easier.
If yous are recording with a microphone, simply clap once or twice before you start playing. So in editing, all you need to do is line up the clap waveform form the audio with the motility of your paw clapping in the video.
If you lot utilize the directly recording method, simply perform a fast muted strum on the strings before you start playing. This quick hit on the strings can be used like a handclapping to sync the audio and video.
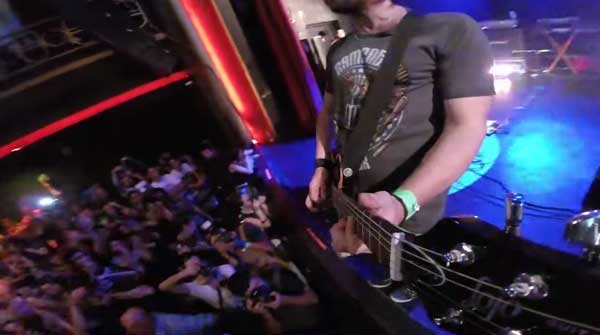
Live Performance or Miming?
If yous program on using multiple camera angles, there are two ways you tin record them.
The showtime style is to record audio with every camera angle and splice the different angles together. If done properly, this means the viewer gets to see a proper performance of the song and the audio will always perfectly match what they are seeing on the screen.
The other way is to record your audio, so play along to the audio during different camera angles. With this approach, you lot're basically miming or 'lip-syncing' to the recording with every new camera angle. This approach is easier during editing as you lot just have ane audio track to worry nearly.
You would be surprised past how many guitar videos on YouTube use the second method. There is a lot of debate over this fashion of recording and whether information technology gives an accurate operation or not. Yous can brand your own mind up on which approach you want to use for your videos.
Video Editing Software for YouTube
Once you accept recorded your video and sound tracks, it's time to edit them. There are many different software packages y'all can use to edit your videos and they vary significantly in features and price.
Adobe Premiere Pro, Top Studio, Corel VideoStudio, Final Cut Pro, Vegas Pro, Windows Movie Maker, iMovie, are all very popular video editing software packages used to edit videos for YouTube.
If you lot want something bones and gratis, attempt out Windows Movie Maker or iMovie.
If you want something more powerful, Peak Studio and Corel VideoStudio are significantly cheaper than Adobe Premiere Pro, Vegas Pro, or Final Cutting Pro.
I personally use Adobe Premiere Pro and while it is incredibly powerful, it was a nightmare to learn. The good news is that for whatsoever of the above programs, there are enough of tutorials on YouTube explaining how to use them.
Take a few tutorials to learn the basics before you lot start editing your offset guitar video. Showtime with a short and simple song and learn the basic techniques to transition between camera angles and sync up the audio and video tracks.
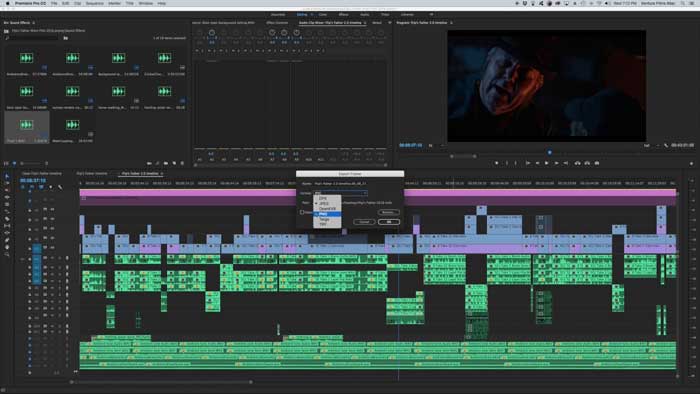
When exporting your video, use these settings for YouTube:
- Resolution: same equally input (should be 1080p or higher depending on what your camera recorded)
- Frame charge per unit: same as input
- Container (format): MP4
- Audio codec: AAC
- Video codec: H.264
Many programs will have presets designed for uploading to YouTube, so wait out for them and use the above details equally a basic guide.
Tips for Starting and Growing a Guitar YouTube Aqueduct
There is a lot y'all can learn from studying other guitar-based YouTube channels. Hither are some useful tips and best practices I've establish from researching popular guitar YouTube channels:
Be Persistent
YouTube's algorithm favors channels that regularly upload videos. This means you lot don't want to upload 10 videos all at once so non practice anything for the next half-dozen months.
If you lot want your YouTube channel to accept the best gamble of success, schedule out your videos and make regular uploads. Beginning past recording 5 videos all at once (to get used to the process) and upload one video per week instead of uploading all of them at once.
Commit to a regular uploading schedule and exist patient. New channels tin can take quite some time before people start finding them and subscribing, so be prepared to stick at it with no viewers in the beginning.
Give People a Reason To Lookout man Your Videos
What will make your videos stand out from all the other guitar videos already on YouTube? Find a style to make your videos different from the other videos out there and actually showcase that difference.
You might have a gimmick y'all employ to grab people's attention such equally playing blindfolded, hanging upside down while playing, or wearing a mask. Or you may showcase some of your personality during your videos like many pop YouTube guitarists.
Sentry some guitar videos and begin ways you lot can stand out from the crowd. Who knows, that dumb gimmick you thought y'all might endeavor might be simply enough for your video to go viral and kick-start your channel.
Practice Makes Perfect
If you look at today'south pop YouTube guitarists, you might get discouraged by how skillful their videos are. But take a await at their video history manner dorsum when they started. Yous may notice that their first videos weren't that good.
Creating videos on YouTube is a skill like any other. Everybody starts off not knowing anything and with practice, you will become meliorate. Don't look your first video to become a viral hit. Learn from every video and keep pushing to make the side by side video even meliorate.
Come up Upwardly With Your Own Style
The most successful guitar YouTube channels all take their own unique personality and style. Some videos are casual while others aim for a very professional person wait.
Think about what type of mode you desire to take in your videos. Exercise some research by watching different pop guitar YouTube channels to run across what you like and dislike.
For example, the below screenshot shows a very specific fashion that uses a color filter to give the video a different look:
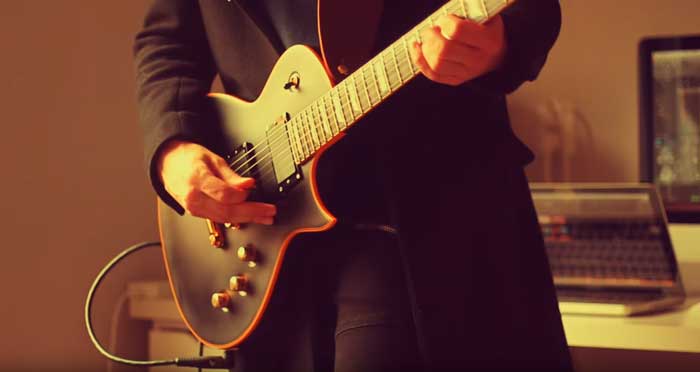
Compare the above screenshot with the below one to run into how much of a departure the colour and lighting makes to the feel of a video:
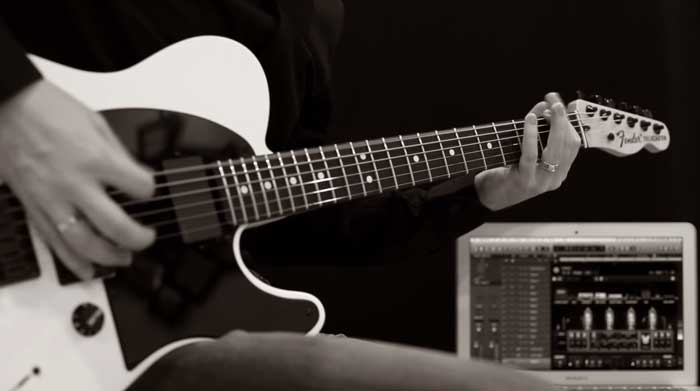
This guitarist uses blackness and white to set himself autonomously from other guitarists on YouTube. Experiment with different ideas to find your own style and set yourself apart from the crowd.
Create Practiced Thumbnails and Titles
The thumbnail you create for each video plays an important part in attracting visitors. Big YouTube channels spend a lot of fourth dimension and effort to create the perfect thumbnail for each video because they know how of import it is to become right.
Do some inquiry to run into what types of thumbnails popular guitar videos use and think almost what mode would adjust your aqueduct. While I don't recommend using clickbait or pulling stupid faces like many YouTubers resort to, y'all do want your thumbnails to be catchy.
Here are some terminal tips to recall when recording guitar videos for YouTube:
- Record at 1080p in either 30 or 60 fps
- Don't use the camera'southward built-in microphone – use a defended microphone or apply directly recording
- Use proper lighting and never rely on natural or ceiling lighting
- Make sure your audio never clips during recording or editing
If you upload a video to YouTube after following this guide, send me a bulletin with the link here and so I tin can check it out!
Related Guides and Lessons:
Source: https://guitargearfinder.com/guides/recording-guitar-youtube/
Posted by: saltzimen1990.blogspot.com
0 Response to "How To Record Youtube Backign Track And Guitar At The Same Time"
Post a Comment